


Verify System Compatibility for a TV Card
TV tuner cards come with software that makes them compatible with a particular operating system. Each card has specific minimum system requirements for free space on the hard drive and processor speed. In addition, some cards are only compatible with USB 2.0 ports and do not function with USB 1.1 ports.
Choose the Right TV Card for Your Laptop 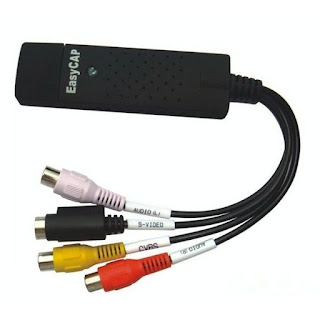
TV cards for PCs are not the same as external TV cards for laptops. PCI TV cards are only compatible with desktop PCs, while USB TV cards are compatible with laptops. There are several USB TV card models available and some are relatively small, which makes them portable. Some of these small TV cards have a built-in antenna, which may not pick up weak signals. Buyers can purchase an external antenna that screws into these cards for a better signal. Other are larger products, roughly the size of a book, have additional features and connections, including FM tuners, built-in signal decoders, and S-video and composite connections. 
Installing the TV Card in Your Laptop

Most external TV tuners come with built-in software and drivers, which makes installation easy. Simply plug the TV card into the USB port and follow the prompts for "Found New Hardware Wizard". If the TV card comes with a software CD, install the media programmes and drivers. After installation, open the programme and follow the prompts to specify which type of signal you use and configure the TV card. Most TV cards also come with a laptop TV remote control. It should have all of the basic controls for changing channels and controlling volume, in addition to DVR functions.
Step by Step: How to Set Up an External TV Tuner
Step 1 With your computer running Windows, plug the tuner hardware into a USB port. If the spacing is tight between the ports on your machine, you may want to use an extension cable with the USB tuner. In most cases it is not advisable to connect the tuner to a USB hub.Step 2 Plug an antenna or cable TV cable into the antenna-cable-TV connector on the tuner. The connector is threaded and looks like the coaxial connector at the back of a TV or cable box. Some tuners include an antenna for receiving over-the-air TV broadcasts. If you want to view over-the-air TV but your unit doesn't have an antenna, you'll have to buy one. Rooftop antennas provide better reception than rabbit-ear antennas. Cable provides better reception than either type of antenna.
Step 3 If your tuner supports video recording, you'll want to plug in the A/V cable included with the device. The cable will have composite video and audio RCA plugs--red, white, yellow--and maybe an S-Video connector at the end of it that plugs into your TV or other device you'll be recording from. Depending on the design of the tuner, the end of the cable that fits into the tuner may be a single plug or another set of composite plugs.
Step 4 When you connect the tuner to your computer, Windows should pop up a 'device found' alert. If it doesn't, you might have to reboot your machine to wake up Windows to the new hardware you've installed. Either way, the alert is your tip-off to install the software packaged with your tuner. Typically that will be a two-step process: The first step installs the drivers for the device, and the second installs the applications for it.
Step 5 Once installed, the software will take you through the steps to start viewing TV on your computer.

