

Disabled iPhones, usually caused by typing in the wrong passcode too many times, are a common occurrence. In this article we explain how to fix a disabled iPhone using iTunes (or iCloud). For more general related advice, see How to bypass a forgotten passcode.
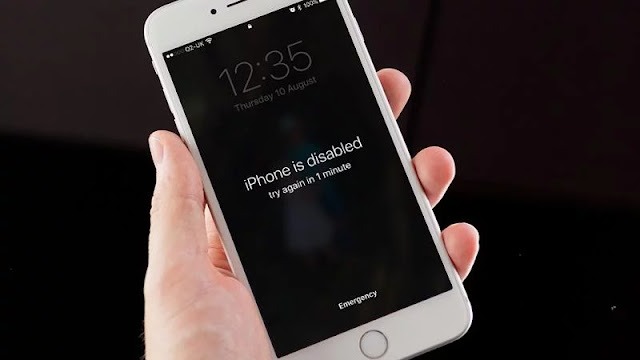
Here's a relatively common - but worrying - notification that you may have seen on your iPhone:
iPhone is disabled. Try again in 1 minute
That's not too bad. But it might be worse:
iPhone is disabled. Try again in 60 minutes
Annoying! And here's the worst error message of all:
iPhone is disabled. Connect to iTunes
These range from mildly inconvenient to totally incapacitating, but you absolutely shouldn't ignore them. If you see the third message, things are bad: you'll be able to unlock the iPhone by connecting it to iTunes, but the data on the phone will be wiped as part of the recovery process, so we hope you backed up. The warnings that include a waiting period are less worrying but can ramp up to the more serious problems if you're not careful.
What do the error messages mean?
These error messages nearly always mean you've got the passcode wrong too many times (or someone else has - did you let the kids play with your smartphone?), and the iPhone has locked down to protect itself from a possible hacking attempt.The iPhone has powerful built-in security measures, and one of these is designed to prevent brute-force attempts to bypass the passcode.
If a phone thief could just keep guessing passcodes - and particularly if they can hook it up to a piece of software that rattles through guesses far quicker than a human - then eventually they'd break in. If you use a four-digit code, remember, there are 'only' 10,000 combinations, which Fortune's tool estimates could be cracked by a human in 4 hours and 6 minutes, and by a computer in 6 minutes and 34 seconds.
To stop this approach, iOS deliberately makes it harder for someone to input lots of incorrect passcodes. Get it wrong a few times (up to five) and you can carry on as normal; make six or seven incorrect attempts and it'll just slow you down a bit, but the more times you get it wrong, the harder things get. Once you get to 10, that's it - no more guesses for you.
Here's how the error messages tie into the number of wrong guesses:
- 6 incorrect guesses: iPhone is disabled. Try again in 1 minute
- 7 incorrect guesses: iPhone is disabled. Try again in 5 minutes
- 8 incorrect guesses: iPhone is disabled. Try again in 15 minutes
- 9 incorrect guesses: iPhone is disabled. Try again in 60 minutes
- 10 incorrect guesses: iPhone is disabled. Connect to iTunes
In other words, the way to avoid seeing these messages in future is to either be more careful about inputting your passcode, use Touch ID instead if your phone supports it, or stop using a passcode at all (although for security reasons we very much advise against this last option).
Please note that the time delays noted above are automatically activated on your iPhone, and cannot be turned off.
Allow us to note in passing, however, that there is a related and more drastic security measure that is optional: one that will wipe the device completely if someone gets the passcode wrong 10 times in a row. This is useful if your iPhone contains data you cannot allow to fall into the wrong hands.
Go into Settings, then Touch ID & Passcode (then enter your passcode), and if you scroll down to the bottom you'll see a toggle next to 'Erase Data'.
Wait
For anywhere up to 9 incorrect guesses, all you need to do is wait. (You'll notice that the 'try again in X minutes' counts down so you can see how long there's left to wait.) You can't do much while you're waiting, but you can still make emergency calls - tap the button at the bottom labelled Emergency.Once the waiting period is up, the screen of your iPhone will change back to the usual background and you'll be able to try again. But it's very important that you input your passcode carefully when you next get a chance. If you get it wrong again you'll be escalated to the next waiting period.
As soon as you get to the 60-minute wait, you're on your last life. Get it wrong one more time and you'll be locked out until you plug the iPhone into iTunes, and the data on the device will realistically be unrecoverable.
If you're getting anywhere near the 10-guess limit, tread very carefully. Is the correct passcode written down anywhere, or is there anyone else who knows it? It may be worth writing down every guess you make from now on (and any that you're sure you've made previously), but this is only to help jog the memory - rather cleverly, iOS counts multiple entries of the same wrong passcode as one wrong guess, so you don't need to worry about wasting any guesses repeating yourself.
If you do reach the 10th incorrect guess, you'll have to move on to the next section of this tutorial.
Restore your iPhone by connecting to iTunes
You've reached your limit of incorrect passcode guesses, and we're sorry to tell you that you now need to wipe the iPhone. You'll be able to restore the data from your last backup, if that's any consolation. You did back up, right?You can restore via iTunes or via iCloud. We'll look at iTunes first - it's generally easier.
Connect the iPhone to the Mac or PC it's usually synced with, and start up iTunes if it doesn't do so automatically.
(For various reasons this may not be possible. Syncing with a Mac or PC is far less of a requirement than it used to be, and you may not have a machine that's synced with your iPhone - in which case you'll need to use Recovery Mode or restore via iCloud. iTunes may also ask for a passcode when you plug in, which in this case is obviously bad news. Try Recovery mode, which we explain below.)
Wait to give iTunes a chance to sync your device, then click Restore iPhone and follow the onscreen prompts. Once iTunes has finished erasing the iPhone's data, you'll get to the Set Up screen - as if you're setting up a new device. You'll get the option at this point to select Restore from iTunes backup and choose the right backup.
For much more detail on erasing an iPhone, see How to reset or wipe an iPhone or iPad.
Use Recovery Mode
Recovery Mode is a more drastic method for wiping your device, and may be worth a try if the above strategy didn't work. Here's how to put your iPhone into Recovery Mode:- Plug the USB cable into your computer but do not connect it to the iPhone.
- Launch iTunes.
- Press and hold down the Home button and Sleep/Wake button for 10 seconds until the iPhone powers off.
- Keep hold of the Home button but let go of the Sleep/Wake button.
- Now plug in the USB Dock/Lightning connector to attach the iPhone to the Mac (keep holding down the Home button).
- iTunes should give a message that states "An iPhone has been detected in recovery mode".
Connecting to iTunes doesn't fix the problem
Fixing the disabled iPhone isn't always as simple as outlined above. Some iPhone owners find that connecting the disabled iPhone to iTunes doesn't do much of anything.If you've tried both the standard iTunes wipe and Recovery Mode, you may be able to wipe it using iCloud, which we explain in the next section.
Restore your iPhone with iCloud
An alternative method of wiping the disabled iPhone and starting again is to use iCloud - this is only possible, however, if you've set up Find My iPhone, and if the disabled iPhone has a data connection.On your Mac (or another iPhone or iPad), go to icloud.com and click on Find iPhone. You'll have to enter the password for your Apple account.
After a brief wait, a map will appear showing the location of your devices. Click All Devices at the top, then select the iPhone you want to erase. Click Erase iPhone.

