

This is the most important trick for those who left their computer open for a while, and other people get access to the computer and with the help of USB, they steal data without prior knowledge.
So let’s have a point to point analyzing the five ways with which you can disable your USB ports on Windows 7/8 PC.
Step 1. Go to desktop and press “Win Button + R“. Now you need to type the command “Regedit” and hit the “OK” button
HIKEY_LOCAL_MACHINE -> SYSTEM -> CURRENT CONTROL SET -> SERVICES ->USBSTOR
Step 3. Now you have just to find out START in the working area. In that, to Disable, just change the Value data with “4” or for Next time if you want to Enable your USB port again then Change it to “3” but remember after every task or changing the value Close your Registry Editor.
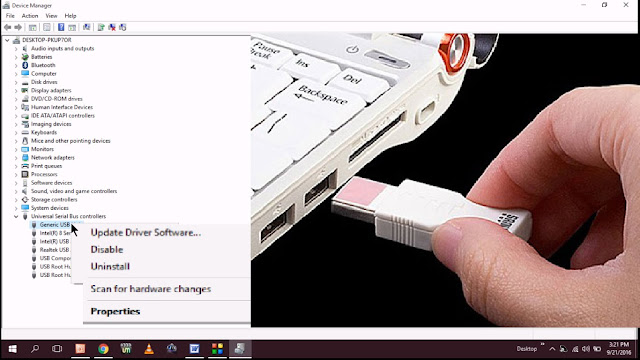
Step 1. You need to Right Click on MY COMPUTER icon -> then select MANAGE ->
Step 2. Then you will see a pop up with windows similar to the above image now at left select the Device Manager.
Step 3. Now you need to find Universal Serial Bus Controllers
Step 4. Under Universal Serial Bus Controllers, select all the devices and with right clickDisable all and see if it is working or not.
If the port was not working, then restart your computer. Don’t forget to enable that device later even after rebooting your computer.
However, Windows will search for USB port drivers and automatically it will install the drivers and your USB will again start working as usual.
The software can easily downloadable from the link here the USB Driver Disable / Enable, What you can do with the software? You can disable and enable your computer’s USB ports.
Step 1. First of all, download and install BuduLock on your Windows computer and run the software.
Step 2. Now you will see the screen like below. Now insert the USB drive on your Windows computer.
Step 3. Now you need to select the option “Flash Drive Lock” which is located just behind the Folder lock option.
Step 4. Now you need to click on Disable Flash drive to block the USB Port. If you want to enable it then just select the option “Enable Flash Drive” and enter your password.
That’s it! You are done this is the easiest way to block USB port on your Windows computer.
So these are the top five ways that can enable or disable your USB ports in Windows. If you need any help regarding the methods described above, you can ask us in a comment section below. I hope you like the post. Share it with your friends too!
The five ways to block or disable USB ports on your computer:
- Altering or changing registry values to disable USB Ports.
- Disabling USB ports from Device Manager.
- By Uninstalling your USB Mass Storage Drivers.
- Using Third-party software
- Use Microsoft Support for Fixing It
So let’s have a point to point analyzing the five ways with which you can disable your USB ports on Windows 7/8 PC.
#1 Disable or Enable USB Drivers and Mass Storage Drivers Using Registry
I would prefer this method for everyone because it helps users to do the process of enabling and disabling the USB ports in fast, effective way irrespective of other methods, if the administrator is quite smart, the register setting will save more time.Step 1. Go to desktop and press “Win Button + R“. Now you need to type the command “Regedit” and hit the “OK” button
Disable or Enable USB Drivers and Mass Storage Drivers Using Registry
Step 2. Now you will be prompted to a window. So in that follow what is writtenHIKEY_LOCAL_MACHINE -> SYSTEM -> CURRENT CONTROL SET -> SERVICES ->USBSTOR
Step 3. Now you have just to find out START in the working area. In that, to Disable, just change the Value data with “4” or for Next time if you want to Enable your USB port again then Change it to “3” but remember after every task or changing the value Close your Registry Editor.
#2 Disabling USB ports from Device Manager
The above method is the perfect way to disable USB ports on computers. However, if the above one failed, you can use another method of disabling the USB ports through the Device Manager.Step 1. You need to Right Click on MY COMPUTER icon -> then select MANAGE ->
Step 2. Then you will see a pop up with windows similar to the above image now at left select the Device Manager.
Step 3. Now you need to find Universal Serial Bus Controllers
Step 4. Under Universal Serial Bus Controllers, select all the devices and with right clickDisable all and see if it is working or not.
If the port was not working, then restart your computer. Don’t forget to enable that device later even after rebooting your computer.
#3 By Uninstalling your USB Mass Storage Drivers
In schools, if administrators are worried about and concerned about more insecurity data breach purpose then the best way to disable the USB ports is by uninstalling of each and every USB drivers installed on your system. The uninstalling of MASS Storage Drivers is the extreme step taken only by the users who think that they for the next time will not be required to transfer data via USB ports eventually.However, Windows will search for USB port drivers and automatically it will install the drivers and your USB will again start working as usual.
#4 Using the Third-Party Software
For disabling the USB ports on your computer after analyzing all the above steps and methods, if you are not satisfied then probably you need to install any third-party software on your computer so that it will block your computer’s USB ports manually with a program software download it from here.The software can easily downloadable from the link here the USB Driver Disable / Enable, What you can do with the software? You can disable and enable your computer’s USB ports.
#5 Using BuduLock
It is a free software which helps you lock any user-defined folder and to block unauthorized access to the USB device. In simple words, it lets you block USB port and lock folders with password protection. This acts as a security tool. Let’s know how to use it.Step 1. First of all, download and install BuduLock on your Windows computer and run the software.
Step 2. Now you will see the screen like below. Now insert the USB drive on your Windows computer.
Step 3. Now you need to select the option “Flash Drive Lock” which is located just behind the Folder lock option.
Step 4. Now you need to click on Disable Flash drive to block the USB Port. If you want to enable it then just select the option “Enable Flash Drive” and enter your password.
That’s it! You are done this is the easiest way to block USB port on your Windows computer.
#6 Disconnect USB
Well, it’s not actually possible everytime to disconnect all the USB Ports from the motherboard. However, you can always disconnect the ones which are on the front side of your computer.
You can disconnect the USB port from the top and front of the computer by plugging out the cable from USB header. Removing the USB header will prevent people from easily misusing them for their benefit.
You can disconnect the USB port from the top and front of the computer by plugging out the cable from USB header. Removing the USB header will prevent people from easily misusing them for their benefit.
#7 Use Microsoft Support for Fixing It
Now if you have seen that the USB ports are not working even after you have replaced the previous settings such as Windows Registry Editor then now you probably need Windows Service Support that is Microsoft Fix it 50061. You just need to apply the setup, and it will fix your problems subsequently.So these are the top five ways that can enable or disable your USB ports in Windows. If you need any help regarding the methods described above, you can ask us in a comment section below. I hope you like the post. Share it with your friends too!

