


The only problem with CD and DVD disc is it don’t last forever and also it’s sensitive. If the disc has your finger print or small scratches because of bad handling, chances are old disc players can’t read the disc properly. As for most modern disc players, it has error correction and can usually read through fingerprints as scratched surface. That is why some players seems to get stuck on some discs while it plays perfectly on another. However, if your disc player is unable to read your disc and you need to get back your data or photo from there, here are a few tools that you can use to try to get back your data before taking chances in some weird unorthodox methods such as using toothpaste, banana skin, candle wax or even flushing it in toilet bowl that may just damage the disc entirely!
There are a lot of things you can do at home to fix a scratched CD and recover your data. This articles lists down 7 super tricks to recover data from scratched/damaged CD/DVD to help you reclaim your data.
Important Note: Before using any of the below listed methods, carefully read the associated precautions and warnings.
1: Masking tape method
Before proceeding you should come to terms with the fact that holes in the foil layer of a CD are NOT repairable, not even by professionals. The best way to move past them is to skip them altogether so that at least the remaining data can be accessed and saved elsewhere.Hold the disc with its shiny side up in clear view of a bright light.
See if any holes are visible on the shiny side.
Flip the disc and mark the areas holes with a permanent marker.
Take 2 small strips of masking tape and stick them on top of each other over the area you have just marked.
Note: The CD might make a noise while running but you’ll be able to access at least 70% of the data on it.
2: Wax method
Apply a very thin layer of Lip-balm / Vaseline / liquid car wax / furniture wax / neutral shoe polish on the shiny playing surface of the CDIf you’ve used any wax, allow it to dry (if specified so by the manufacturer)
Using a clean, soft, lint-free cloth, wipe off the excess in a radial motion (inside-to-outside).
Test the disc. If it plays, immediately backup the data on it since this is a temporary solution.
3: Clean the disc
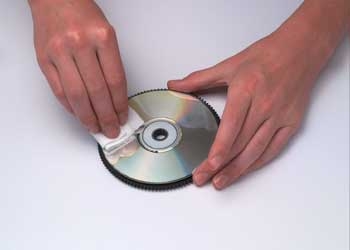
Wash the disc with warm water to remove dust.
If you can see dirt accumulated on the surface, gently rub it with a finger while washing.
To clean it more effectively, use a mild detergent or liquid soap dissolved in water. You could also use alcohol for cleaning the disc. However, in that case use a cotton swab to clean.
While cleaning it, rub the CD in radial motion (starting near the center and straight toward the outer edge).
To dry it, avoid using cloth or towel. Shake the CD to drip off excess water and let it air-dry. Do not place it in the sun.
Test the disc. If it still doesn’t play, try another CD player; it may handle scratched better.
If it does play, immediately take its backup.
4: Light-bulb method
This method might not work every time, but it is worth a try. Plus it is simple.Switch on a 60 watt incandescent filament bulb.
Thread the CD into your index finger and hold the shiny side at a distance of 10 cm (4 inches) from the lamp facing towards it.
Hold it like that for not more than 20 seconds while rotating it slowly around the threaded finger. DO NOT hold it under the light-bulb for more than 20 seconds since it might start melting from the heat.
While the CD is still hot, play it in the CD drive.
If it plays, save all data on it to the computer.
5: Polishing Method
Warning: This method should be used only as a last resort since it can further damage the disc. Read the instructions carefully before going ahead.The logic behind this step is that polishing a scratched CD removes some of the outer plastic coating thus making the scratched shallower. To polish the CD, household baking soda based toothpaste is most commonly used.
Apply a small amount of toothpaste (paste not gel) to a clean, soft, lint-free cloth.
Gently rub the cloth on the scratch in a radial motion (starting at the center and rubbing out to the edge).
Do this 10 – 12 times or for a couple of minutes applying more toothpaste as necessary. Do not apply too much pressure.
Wash the CD with warm water to remove the toothpaste and let it air-dry.
Test the disc. If it plays, copy its contents elsewhere immediately.

